Category: vue

Create & Publish your first Vue.js library to npm: part 2

As we work along with the javascript framework (vue / react) we will realize that there are custom components in our application that you might need to re-use in different applications or sometimes we have to share with the community.

Let’s see how to publish our first component into npm and use it in our project.

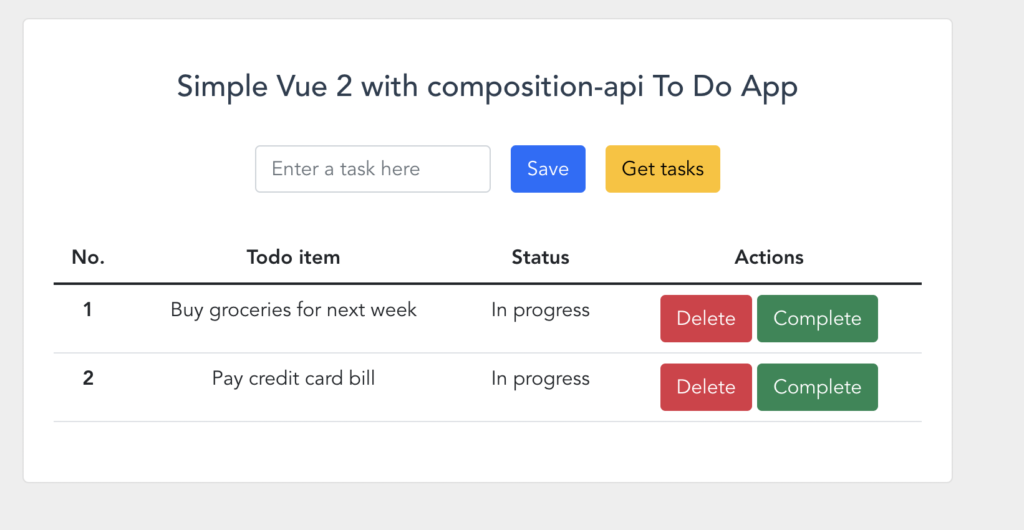
In my previous post, I explain how to create a vuejs plugin and use it in our project. In this post I am going to use the same project to publish in npm

please refer to my previous post here if you miss it

Configuring Package.json

In the last blog, I explain how to create and use the library/plugin. Lets recap important things to do before publishing into npm

After we build library/plugin files into dist folder, we have to update our package.json

Let us add the main entry point in packge.json file

"main": "./dist/lib.umd.min.js",

Now let’s whitelist what are the files needed when someone is using them inside their node_modules. Here we need to include only dist folder from our project.

"files": [ "dist/*"],

Pushing compiled source code is the right way to publish in NPM. Users usually won’t edit this code. if they want to make changes, they can fork from version control systems (like Github).
In case you want to include all files, we add like below

"files": [
  "dist/*",
  "src/*", 
  "folder/*",
],

Let’s add additional details like author details and license also into the package.json

{
  "name": "sb-vue-component-library",
  "version": "0.1.0",
  "private": false,
  "license": "MIT",
  "author": { 
    "name" : "Shabeeb K",
    "email" : "mail@shabeebk.com",
    "url" : "http://shabeebk.com/"
  },
  "main": "./dist/lib.umd.min.js",
  "files": [ "dist/*"],
  "scripts": {
    "serve": "vue-cli-service serve",
    "build": "vue-cli-service build",
    "lint": "vue-cli-service lint",
    "build:lib": "vue-cli-service build --name lib --target lib --dest dist src/lib-setup.js"
  },
  "dependencies": {
    "core-js": "^3.8.3",
    "vue": "^2.6.14"
  },
  "devDependencies": {
    "@babel/core": "^7.12.16",
    "@babel/eslint-parser": "^7.12.16",
    "@vue/cli-plugin-babel": "~5.0.0",
    "@vue/cli-plugin-eslint": "~5.0.0",
    "@vue/cli-service": "~5.0.0",
    "eslint": "^7.32.0",
    "eslint-plugin-vue": "^8.0.3",
    "vue-template-compiler": "^2.6.14"
  },
  "peerDependencies": {
    "vue": "^2.6.14"
  }
}

What are these fields if you wonder

  • name: Name of the component
  • version: the version number of our plugin/library. You will have to increment this number every time you publish an update for your package. usually we follow semantic versioning
  • private : This means your package is public (i.e. everyone is able to see and install it).
  • license: license for our package
  • author: author details
  • main:  The primary entry point to our plugin.
  • files: specifies which files should be published on NPM.

For more details please refer npmjs

Add license file

In GitHub, it’s easy to add a license, If you are using MIT license,

Click on add file in GitHub and name it as License.md

Then we can see choose from the template. Here i am using  MIT license 

Commit changes to Github.

Publish to npm

If you don’t have an account in npmjs.com. create one.

Lets login from the command line

npm login

This will ask you to enter the user name and password of the npm account. (TFA if you enable it ).

once login it will show message

Logged in as username on https://registry.npmjs.org/.

Let us do a build

 npm run build:lib

now we can publish to npm

npm publish

I faced some issue since my component name is already existing in vue, so I updated component name

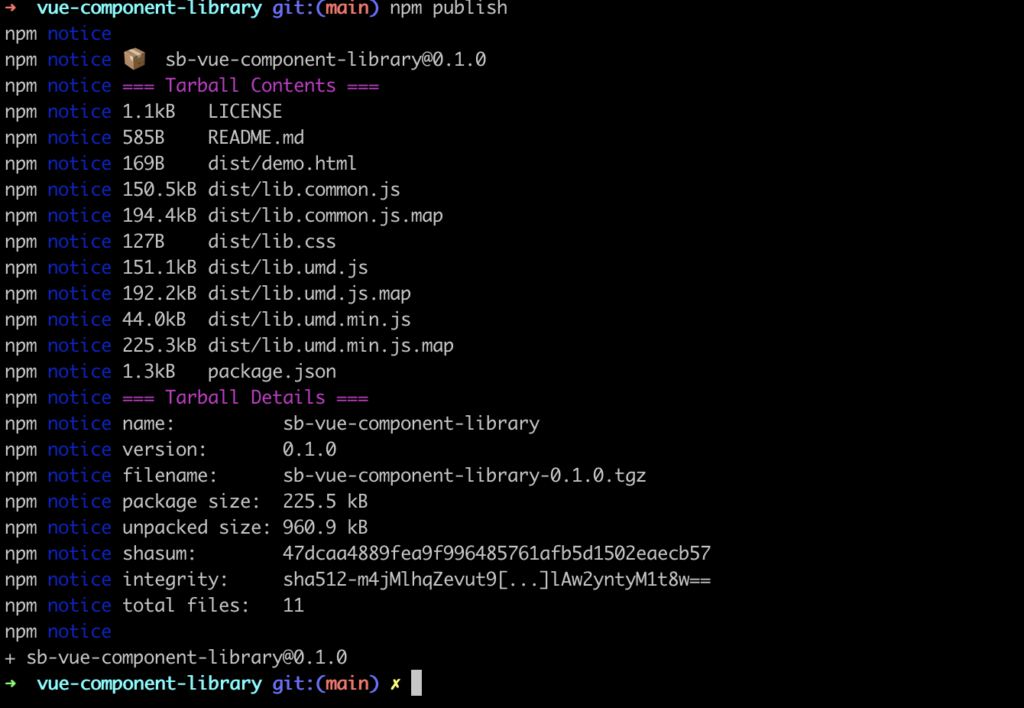
It will appear in npmjs immediately

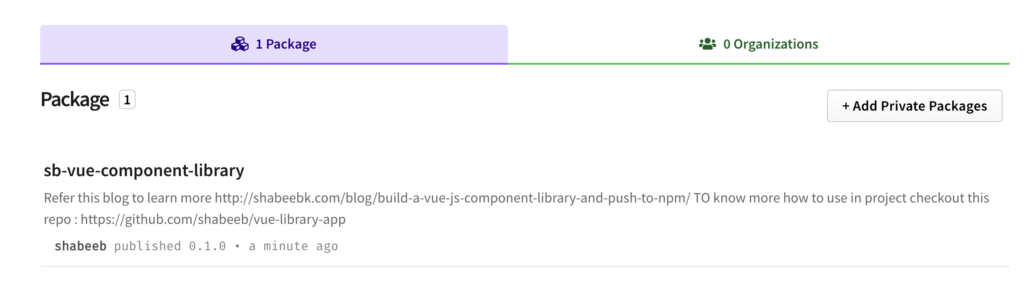
Yey, we did it :). Now anyone can use this package in their project

Using package

To use package in the project

npm install --save sb-vue-component-library

To use it globally , in main.js

import myButton from "sb-vue-component-library";
Vue.use(myButton);

To use it inside a component,

import myButton from "sb-vue-component-library";

Thats it, Now we publish our component into npm and use it in different project

 661 total views

Vue 3 composition API tutorial: with example project

When Vue 3 was released one of the most exciting features are Composition API . An alternative to Options API.  In this article, let’s take a look at how we can use Composition API in our project

Full source code available in GitHub repo

Demo link: https://vue3-composition-api.pages.dev/

Vue 3 Setup

Now let’s start by installing Vue CLI globally. If you already have the CLI, make sure your running at least (I am using Vue CLI v5.0.4)

npm install -g vue-cli

We’ll use the Vue CLI to build a simple application( I am using vue3-composition-todo as project name here )

vue create vue3-composition-todo

Here I am selecting default Vue 3

After installation move into the folder and as shown above cd vue3-composition-todo and start-server npm run serve . This will start a development server and we can see it on http://localhost:8080/

Install plugins

Let us install Bootstrap for styles in our project

npm install bootstrap --save

lets import in bootstrap CSS in App.vue (We are using only Bootstrap CSS)

import 'bootstrap/dist/css/bootstrap.css'

Final code in main.js looks like below

import { createApp } from 'vue'
import App from './App.vue'
import 'bootstrap/dist/css/bootstrap.css'

createApp(App).mount('#app')

Create UI for TODO

First let’s create a file inside the component TodoList.vue

Inside template, we can do small HTML to show todo list

<template>
  <div class="hello">
    <section class="vh-100" style="background-color: #eee">
      <div class="container py-5 h-100">
        <div class="row d-flex justify-content-center align-items-center h-100">
          <div class="col col-lg-9 col-xl-7">
            <div class="card rounded-3">
              <div class="card-body p-4">
                <table class="table mb-4">
                  <thead>
                    <tr>
                      <th scope="col">No.</th>
                      <th scope="col">Todo item</th>
                      <th scope="col">Status</th>
                      <th scope="col">Actions</th>
                    </tr>
                  </thead>

                  <tbody data-v-3de47834="">
                    <tr class="" data-v-3de47834="">
                      <th scope="row" data-v-3de47834="">1</th>
                      <td data-v-3de47834="">Buy groceries for next week</td>
                      <td data-v-3de47834="">In progress</td>
                      <td data-v-3de47834="">
                        <button
                          type="submit"
                          class="btn btn-danger"
                          data-v-3de47834=""
                        >
                          Delete</button
                        ><button
                          type="submit"
                          class="btn btn-success ms-1"
                          data-v-3de47834=""
                        >
                          Complete
                        </button>
                      </td>
                    </tr>
                    <tr class="" data-v-3de47834="">
                      <th scope="row" data-v-3de47834="">2</th>
                      <td data-v-3de47834="">Pay credit card bill</td>
                      <td data-v-3de47834="">In progress</td>
                      <td data-v-3de47834="">
                        <button
                          type="submit"
                          class="btn btn-danger"
                          data-v-3de47834=""
                        >
                          Delete</button
                        ><button
                          type="submit"
                          class="btn btn-success ms-1"
                          data-v-3de47834=""
                        >
                          Complete
                        </button>
                      </td>
                    </tr>
                  </tbody>
                </table>
              </div>
            </div>
          </div>
        </div>
      </div>
    </section>
  </div>
</template>

<script>

</script>

<!-- Add "scoped" attribute to limit CSS to this component only -->
<style scoped>
h3 {
  margin: 40px 0 0;
}
ul {
  list-style-type: none;
  padding: 0;
}
li {
  display: inline-block;
  margin: 0 10px;
}
a {
  color: #37dd92;
}
a.link {
  color: #3771dd;
}
.stricked {
  text-decoration: line-through;
}
</style>

Create composable function

Now we can create a new folder composable inside src (we can use clean code and write in separate composable function )

In composible/useTodoList.js we can add some basic TodosList

import { reactive } from "vue";
function useTodoList() {
  let state = reactive({
 
    todos: [
      {
        id: 1,
        title: "Buy groceries for next week",
        completed: false,
      },
      {
        id: 2,
        title: "Pay credit card bill ",
        completed: false,
      },
    ],
  });

  
  return {
    state,
  };
}

export default useTodoList

Now we can import useTodoList in TodoList.vue and tweak some code

<template>
 ...

                  <tbody>
                    <tr
                      v-for="(todo, idx) in state.todos"
                      :key="todo.id"
                      :class="todo.completed && 'stricked'"
                    >
                      <th scope="row">{{ idx + 1 }}</th>
                      <td>{{ todo.title }}</td>
                      <td>
                        {{ todo.completed ? "Completed" : "In progress" }}
                      </td>
                      <td>
                        <button
                          type="submit"
                          class="btn btn-danger"
                          @click="removeItem(todo)"
                        >
                          Delete
                        </button>
                        <button
                          type="submit"
                          class="btn btn-success ms-1"
                          @click="toggleCompleted(todo)"
                        >
                          {{ todo.completed ? "Re-open" : "Complete" }}
                        </button>
                      </td>
                    </tr>
                  </tbody>
             ...
</template>

<script>
import useTodoList from "@/composable/useTodoList";
export default {
  setup() {
    const { state } = useTodoList();
    return {
      state,
    };
  },
};
</script>
...

Let us try to run the server

npm run serve

Access http://localhost:8080/ and we can see our code is running 🙂

Add todo

Let us add some input fields to add a todo to list

in TodoList.vue

<form
                  class="row row-cols-lg-auto g-3 justify-content-center align-items-center mb-4 pb-2"
                  @submit.prevent="addToDo"
                >
                  <div class="col-12">
                    <div class="form-outline">
                      <input
                        type="text"
                        id="form1"
                        v-model="state.newTodo"
                        class="form-control"
                        placeholder="Enter a task here"
                      />
                    </div>
                  </div>

                  <div class="col-12">
                    <button
                      type="button"
                      class="btn btn-primary"
                      @click="addToDo"
                    >
                      Save
                    </button>
                  </div>
                </form>
...
<script>
...
  setup() {
    const { state, addToDo } =
      useTodoList();
    return {
      state,
      addToDo,
      
    };
};
...
</script>

In useTodoList.js we can add new methode and export

...  
function addToDo(e) {
    e.preventDefault();
    state.todos.push({
      id: state.todos.length + 1,
      title: state.newTodo,
      completed: false,
    });
    state.newTodo = "";
  }
...
return {
    state,
    addToDo, 
  };
...

We have a save function now, after typing on click of saving we call addToDo and push data into our todos object. and the table will re-render and show a new to-do items.

The same way we can add more functionality like removeItem (delete a todo item on click of delete button), toggleCompleted (toggle as completed and in progress) and addTodoForme (adding sample data )

Final code

final code in component/TodoList.vue

<template>
  <div class="hello">
    <section class="vh-100" style="background-color: #eee">
      <div class="container py-5 h-100">
        <div class="row d-flex justify-content-center align-items-center h-100">
          <div class="col col-lg-9 col-xl-7">
            <div class="card rounded-3">
              <div class="card-body p-4">
                <div>
                  <a
                    href="http://shabeebk.com/blog/simple-vue-composition-api-example-with-todo-app/"
                    target="_sb"
                    class="link"
                    >Read Full Blog
                  </a>
                </div>
                <h4 class="text-center my-3 pb-3">
                  Vue 3 with composition-api To Do App
                </h4>

                <form
                  class="row row-cols-lg-auto g-3 justify-content-center align-items-center mb-4 pb-2"
                  @submit.prevent="addToDo"
                >
                  <div class="col-12">
                    <div class="form-outline">
                      <input
                        type="text"
                        id="form1"
                        v-model="state.newTodo"
                        class="form-control"
                        placeholder="Enter a task here"
                      />
                    </div>
                  </div>

                  <div class="col-12">
                    <button
                      type="button"
                      class="btn btn-primary"
                      @click="addToDo"
                    >
                      Save
                    </button>
                  </div>

                  <div class="col-12">
                    <button
                      type="button"
                      class="btn btn-warning"
                      @click="addTodoForme"
                    >
                      Add sample
                    </button>
                  </div>
                </form>

                <table class="table mb-4">
                  <thead>
                    <tr>
                      <th scope="col">No.</th>
                      <th scope="col">Todo item</th>
                      <th scope="col">Status</th>
                      <th scope="col">Actions</th>
                    </tr>
                  </thead>

                  <tbody>
                    <tr
                      v-for="(todo, idx) in state.todos"
                      :key="todo.id"
                      :class="todo.completed && 'stricked'"
                    >
                      <th scope="row">{{ idx + 1 }}</th>
                      <td>{{ todo.title }}</td>
                      <td>
                        {{ todo.completed ? "Completed" : "In progress" }}
                      </td>
                      <td>
                        <button
                          type="submit"
                          class="btn btn-danger"
                          @click="removeItem(todo)"
                        >
                          Delete
                        </button>
                        <button
                          type="submit"
                          class="btn btn-success ms-1"
                          @click="toggleCompleted(todo)"
                        >
                          {{ todo.completed ? "Re-open" : "Complete" }}
                        </button>
                      </td>
                    </tr>
                  </tbody>
                </table>
              </div>
            </div>
          </div>
        </div>
      </div>
    </section>
  </div>
</template>

<script>
import useTodoList from "@/composable/useTodoList";
export default {
  setup() {
    const { state, addToDo, toggleCompleted, removeItem, addTodoForme } =
      useTodoList();
    return {
      state,
      addToDo,
      toggleCompleted,
      removeItem,
      addTodoForme,
    };
  },
};
</script>

<!-- Add "scoped" attribute to limit CSS to this component only -->
<style scoped>
h3 {
  margin: 40px 0 0;
}
ul {
  list-style-type: none;
  padding: 0;
}
li {
  display: inline-block;
  margin: 0 10px;
}
a {
  color: #37dd92;
}
a.link {
  color: #3771dd;
}
.stricked {
  text-decoration: line-through;
}
</style>

In composable/useTodoList.js

import { reactive } from "vue";
function useTodoList() {
  let state = reactive({
    newTodo: "",
    todos: [
      {
        id: 1,
        title: "Buy groceries for next week",
        completed: false,
      },
      {
        id: 2,
        title: "Pay credit card bill ",
        completed: false,
      },
    ],
  });

  function addToDo(e) {
    e.preventDefault();
    state.todos.push({
      id: state.todos.length + 1,
      title: state.newTodo,
      completed: false,
    });
    state.newTodo = "";
  }

  function toggleCompleted(item) {
    item.completed = !item.completed;
  }
  function removeItem(item) {
    state.todos = state.todos.filter((newItem) => newItem.id !== item.id);
  }
  function addTodoForme(e) {
    e.preventDefault();
    const text = `New to do list item with id ${state.todos.length + 1}`;
    state.todos.push({
      id: state.todos.length + 1,
      title: text,
      completed: false,
    });
  }
  return {
    state,
    addToDo,
    toggleCompleted,
    removeItem,
    addTodoForme,
  };
}

export default useTodoList;

And final output

Conclusion

Finally, we’ve built our app with Vue 3 Composition API.
I hope you learned a few things about Vue 3 and Composition API, Let me know if you have any comments

You can download the full source code from my GitHub repo

Demo link: https://vue3-composition-api.pages.dev/

 809 total views

Vue composition API tutorial with example

In this, I’ll show you how to vue2 composition API.

Let us do a small example todo app with Vue composition API
Vue 3 come up with Composition API, in Vue 2, we use The Options API, where we use uses options like datamethods, and mounted. With the Composition API, we have a setup hook in which we write our reactive code and functions.
We can re-use the same functions in between components using Composition API, and save a lot of time.

Demo: https://vue-composition-api-simple-todo.pages.dev/

Setup and Installation

We can install vueCLI and create a new project using vue create vue-composition-api-simple-todo. Please refer to my previous post in case you missed it.
Once we create our Vue project open the code base and let’s start with installing @vue/composition-api

Install dependencies

 npm i  @vue/composition-api --save

Let us take the same HTML from my last past, simple vue todo app Here you can read it if you miss

Let us import @vue/composition-api and use it main.js

import CompositionApi from '@vue/composition-api'
Vue.use(CompositionApi)

Start with coding

Full code of main.js looks like below

import Vue from 'vue'
import App from './App.vue'
import CompositionApi from '@vue/composition-api'

Vue.config.productionTip = false
Vue.use(CompositionApi)

new Vue({
  render: h => h(App),
}).$mount('#app')

Let us create a new folder for composable functions

We can define Todos list in composable function like below

import { reactive } from "@vue/composition-api";
function useTodoList() {
  let state = reactive({
    newTodo: "",
    todos: [
      {
        id: 1,
        title: "Buy groceries for next week",
        completed: false,
      },
      {
        id: 2,
        title: "Pay credit card bill ",
        completed: false,
      },
    ],
  });

  return {
    state, 
  };
}

export default useTodoList

We use the same date, in composition functions, we will define state using Reactivity API, e.g. ref() and reactive(), that allows us to directly create reactive state, computed state, and watchers.
In this example, we use reactive to define the state and now we can use todos inside out template.

in components/TodoList.vue we can import composable function

import useTodoList from "@/composable/useTodoList";
export default {
  setup() {
    const { state} = useTodoList();
    return {
      state,
    };
  },
};

and we can use it in the template

<tbody>
                    <tr
                      v-for="(todo, idx) in state.todos"
                      :key="todo.id"
                      :class="todo.completed && 'stricked'"
                    >
                      <th scope="row">{{ idx + 1 }}</th>
                      .....
                    </tr>
                  </tbody>

Start the app

If we run the application we can see a list of todos 🙂

Let’s add more functionality like addtodo toggleCompleted and removeItem in composable/useTodoList.js.
The final code looks like below

import { reactive } from "@vue/composition-api";
function useTodoList() {
 ......

  function addToDo(e) {
    console.log("state.newTodo", state, state.newTodo);
    e.preventDefault();
    state.todos.push({
      id: state.todos.length + 1,
      title: state.newTodo,
      completed: false,
    });
    state.newTodo = "";
  }

  function toggleCompleted(item) {
    item.completed = !item.completed;
  }
  function removeItem(item) {
    state.todos = state.todos.filter((newItem) => newItem.id !== item.id);
  }
  return {
    state,
    addToDo,
    toggleCompleted,
    removeItem,
  };
}

export default useTodoList

Let us import addtodo toggleCompleted and removeItem in components/TodoList.vue


<script>
import useTodoList from "@/composable/useTodoList";
export default {
  setup() {
    const { state, addToDo, toggleCompleted, removeItem } = useTodoList();
    return {
      state,
      addToDo,
      toggleCompleted,
      removeItem,
    };
  },
};
</script>

How we can use it in the template?

....
                  <div class="col-12">
                    <button
                      type="button"
                      class="btn btn-primary"
                      @click="addToDo"
                    >
                      Save
                    </button>
                  </div>

                  .......

                  <tbody>
                    <tr
                      v-for="(todo, idx) in state.todos"
                      :key="todo.id"
                      :class="todo.completed && 'stricked'"
                    >
                      <th scope="row">{{ idx + 1 }}</th>
                      <td>{{ todo.title }}</td>
                      <td>
                        {{ todo.completed ? "Completed" : "In progress" }}
                      </td>
                      <td>
                        <button
                          type="submit"
                          class="btn btn-danger"
                          @click="removeItem(todo)"
                        >
                          Delete
                        </button>
                        <button
                          type="submit"
                          class="btn btn-success ms-1"
                          @click="toggleCompleted(todo)"
                        >
                          {{ todo.completed ? "Re-open" : "Complete" }}
                        </button>
                      </td>
                    </tr>
                  </tbody>
             
             ....

Once we run the server, we can see add toggle and remove is working

vue composition api todo example

Getting everything working

components/TodoList.vue

<template>
  <div class="hello">
    <section class="vh-100" style="background-color: #eee">
      <div class="container py-5 h-100">
        <div class="row d-flex justify-content-center align-items-center h-100">
          <div class="col col-lg-9 col-xl-7">
            <div class="card rounded-3">
              <div class="card-body p-4">
                <h4 class="text-center my-3 pb-3">
                  Simple Vue 2 with composition-api To Do App
                </h4>

                <form
                  class="row row-cols-lg-auto g-3 justify-content-center align-items-center mb-4 pb-2"
                  @submit.prevent="addToDo"
                >
                  <div class="col-12">
                    <div class="form-outline">
                      <input
                        type="text"
                        id="form1"
                        v-model="state.newTodo"
                        class="form-control"
                        placeholder="Enter a task here"
                      />
                    </div>
                  </div>

                  <div class="col-12">
                    <button
                      type="button"
                      class="btn btn-primary"
                      @click="addToDo"
                    >
                      Save
                    </button>
                  </div>

                  <div class="col-12">
                    <button type="submit" class="btn btn-warning">
                      Get tasks
                    </button>
                  </div>
                </form>

                <table class="table mb-4">
                  <thead>
                    <tr>
                      <th scope="col">No.</th>
                      <th scope="col">Todo item</th>
                      <th scope="col">Status</th>
                      <th scope="col">Actions</th>
                    </tr>
                  </thead>

                  <tbody>
                    <tr
                      v-for="(todo, idx) in state.todos"
                      :key="todo.id"
                      :class="todo.completed && 'stricked'"
                    >
                      <th scope="row">{{ idx + 1 }}</th>
                      <td>{{ todo.title }}</td>
                      <td>
                        {{ todo.completed ? "Completed" : "In progress" }}
                      </td>
                      <td>
                        <button
                          type="submit"
                          class="btn btn-danger"
                          @click="removeItem(todo)"
                        >
                          Delete
                        </button>
                        <button
                          type="submit"
                          class="btn btn-success ms-1"
                          @click="toggleCompleted(todo)"
                        >
                          {{ todo.completed ? "Re-open" : "Complete" }}
                        </button>
                      </td>
                    </tr>
                  </tbody>
                </table>
              </div>
            </div>
          </div>
        </div>
      </div>
    </section>
  </div>
</template>

<script>
import useTodoList from "@/composable/useTodoList";
export default {
  setup() {
    const { state, addToDo, toggleCompleted, removeItem } = useTodoList();
    return {
      state,
      addToDo,
      toggleCompleted,
      removeItem,
    };
  },
};
</script>

<!-- Add "scoped" attribute to limit CSS to this component only -->
<style scoped>
h3 {
  margin: 40px 0 0;
}
ul {
  list-style-type: none;
  padding: 0;
}
li {
  display: inline-block;
  margin: 0 10px;
}
a {
  color: #37dd92;
}
.stricked {
  text-decoration: line-through;
}
</style>

composable/useTodoList.js

import { reactive } from "@vue/composition-api";
function useTodoList() {
  let state = reactive({
    newTodo: "",
    todos: [
      {
        id: 1,
        title: "Buy groceries for next week",
        completed: false,
      },
      {
        id: 2,
        title: "Pay credit card bill ",
        completed: false,
      },
    ],
  });

  function addToDo(e) {
    console.log("state.newTodo", state, state.newTodo);
    e.preventDefault();
    state.todos.push({
      id: state.todos.length + 1,
      title: state.newTodo,
      completed: false,
    });
    state.newTodo = "";
  }

  function toggleCompleted(item) {
    item.completed = !item.completed;
  }
  function removeItem(item) {
    state.todos = state.todos.filter((newItem) => newItem.id !== item.id);
  }
  return {
    state,
    addToDo,
    toggleCompleted,
    removeItem,
  };
}

export default useTodoList

That’s it Yey !!!

Repo: https://github.com/shabeeb/vue-composition-api-simple-todo

Demo: https://vue-composition-api-simple-todo.pages.dev/

Thank you for reading and Happy coding 🙂

 1,009 total views,  1 views today

Simple Vue 2 Tutorial with Example app


Let’s make a simple vue project example with a TODO list

Setup and Installation

There are two ways to set up Vue: through a VueCLI, or by including a script inside of your HTML file. Let’s do with VueCLI, We can install vue vueCLI globally

npm install -g @vue/cli or yarn global add @vue/cli

Once install complete, let’s create a project by using the below comment

vue create vue-simple-todo

Lets select Vue 2 for this example

Lets select Vue 2 for this example and click enter

Then it will ask for package manager ( Here i am going with npm in this case)

Here is my final screenshot after completing project stup

Now as mentioned there we can cd into folder and start server

npm run serve

Now server will run on http://localhost:8080/. We can open a browser and see basic vue template in browser

deafault vue page

Now let’s take a look on codebase (I am using VS Code for editing files)

We can see App.vue and components folder below

Let’s start our coding 🙂

Let’s start with some cleanup, remove HelloWorld.vue from components, and create a new file TodoList.vue

Then we can import TodoList.vue inside App.vue

<template>
  <div id="app">
    <TodoList />
  </div>
</template>

<script>
import TodoList from "./components/TodoList.vue";

export default {
  name: "App",
  components: {
    TodoList,
  },
};
</script>

In TodoList.vue, We can start with the todo Skelton template, a very basic HTML todo Layout, and a simple vue class.

<template>
  <div class="hello">
    <section class="vh-100" style="background-color: #eee">
      <div class="container py-5 h-100">
        <div class="row d-flex justify-content-center align-items-center h-100">
          <div class="col col-lg-9 col-xl-7">
            <div class="card rounded-3">
              <div class="card-body p-4">
                <h4 class="text-center my-3 pb-3">Simple Vue To Do App</h4>

                <form
                  class="row row-cols-lg-auto g-3 justify-content-center align-items-center mb-4 pb-2"
                >
                  <div class="col-12">
                    <div class="form-outline">
                      <input type="text" id="form1" class="form-control"
placeholder="Enter a task here" />
                      
                    </div>
                  </div>

                  <div class="col-12">
                    <button type="submit" class="btn btn-primary">Save</button>
                  </div>

                  <div class="col-12">
                    <button type="submit" class="btn btn-warning">
                      Get tasks
                    </button>
                  </div>
                </form>

                <table class="table mb-4">
                  <thead>
                    <tr>
                      <th scope="col">No.</th>
                      <th scope="col">Todo item</th>
                      <th scope="col">Status</th>
                      <th scope="col">Actions</th>
                    </tr>
                  </thead>
                  <tbody>
                    <tr>
                      <th scope="row">1</th>
                      <td>Buy groceries for next week</td>
                      <td>In progress</td>
                      <td>
                        <button type="submit" class="btn btn-danger">
                          Delete
                        </button>
                        <button type="submit" class="btn btn-success ms-1">
                          Finished
                        </button>
                      </td>
                    </tr>
                    <tr>
                      <th scope="row">2</th>
                      <td>Renew car insurance</td>
                      <td>In progress</td>
                      <td>
                        <button type="submit" class="btn btn-danger">
                          Delete
                        </button>
                        <button type="submit" class="btn btn-success ms-1">
                          Complete
                        </button>
                      </td>
                    </tr>
                  </tbody>
                </table>
              </div>
            </div>
          </div>
        </div>
      </div>
    </section>
  </div>
</template>

<script>
export default {
  name: "TodoList",
};
</script>

<!-- Add "scoped" attribute to limit CSS to this component only -->
<style scoped>
h3 {
  margin: 40px 0 0;
}
ul {
  list-style-type: none;
  padding: 0;
}
li {
  display: inline-block;
  margin: 0 10px;
}
a {
  color: #37dd92;
}
.stricked {
  text-decoration: line-through;
}
</style>

To get bootstrap let’s add bootstrap CDN to index.html (Or we install and add in App.vue also)

<link
      href="https://cdn.jsdelivr.net/npm/bootstrap@5.1.3/dist/css/bootstrap.min.css"
      rel="stylesheet"
      integrity="sha384-1BmE4kWBq78iYhFldvKuhfTAU6auU8tT94WrHftjDbrCEXSU1oBoqyl2QvZ6jIW3"
      crossorigin="anonymous"
    />

Now We can define data inside vue class, and move HTML labels from template to todos variable inside data. Here we define our todo list variable and assign some values.

data() {
    return {
      todos: [
        {
          id: 1,
          title: "Buy groceries for next week",
          completed: false,
        },
        {
          id: 2,
          title: "Renew car insurance",
          completed: false,
        },
      ],
    };
  },

Let’s add some logic to template also,
Since we moved todos from HTML table to vue, we can use v-for to show data in HTML as shown below.

<table class="table mb-4">
                  <thead>
                    ......
                  </thead>
                  <tbody>
                    <tr v-for="(todo, idx) in todos" :key="todo.id">
                      <th scope="row">{{ idx + 1 }}</th>
                      <td>{{ todo.title }}</td>
                      <td>
                        {{ todo.completed ? "Completed" : "In progress" }}
                      </td>
                      <td>
                        <button type="submit" class="btn btn-danger">
                          Delete
                        </button>
                        <button type="submit" class="btn btn-success ms-1">
                          Complete
                        </button>
                      </td>
                    </tr>
                  </tbody>
                </table>

Now the out will show as below

Now let us add some logic to save functionality

Add v-modal for input button and define v-modal inside data()

<input
                        type="text"
                        id="form1"
                        v-model="newTodo"
                        class="form-control"
                        placeholder="Enter a task here"
                      />

......
data() {
    return {
      newTodo: "",
      todos: [
        {
          id: 1,
          title: "Buy groceries for next week",
          completed: false,
        },
        {
          id: 2,
          title: "Pay credit card bill ",
          completed: false,
        },
      ],
    };
  },

Let’s add the click functionality for the save button, We can add methods below data() add functionality as below.
Finally, we will clear newTodo once we added to the current list. On the template, we call this method on the save button as below

<template>
....
<button
                      type="button"
                      class="btn btn-primary"
                      @click="addToDo"
                    >
                      Save
                    </button>
</tempate>
<script>
data() {
.....
},
methods: {
    addToDo(e) {
      e.preventDefault();
      this.todos.push({
        id: this.todos.length + 1,
        title: this.newTodo,
        completed: false,
      });
      this.newTodo = "";
    },
    
  },
.....

Now run server and see in action, we can type todo and on click, it will come on below list.

let’s add remove functionality and toggle functionality. To add both

<template>
.....
<tbody>
                    <tr
                      v-for="(todo, idx) in todos"
                      :key="todo.id"
                      :class="todo.completed && 'stricked'"
                    >
                      <th scope="row">{{ idx + 1 }}</th>
                      <td>{{ todo.title }}</td>
                      <td>
                        {{ todo.completed ? "Completed" : "In progress" }}
                      </td>
                      <td>
                        <button
                          type="submit"
                          class="btn btn-danger"
                          @click="removeItem(todo)"
                        >
                          Delete
                        </button>
                        <button
                          type="submit"
                          class="btn btn-success ms-1"
                          @click="toggleCompleted(todo)"
                        >
                          {{ todo.completed ? "Re-open" : "Complete" }}
                        </button>
                      </td>
                    </tr>
                  </tbody>
.....
</template>
<script>
......

 methods: {
    addToDo(e) {
      e.preventDefault();
      this.todos.push({
        id: this.todos.length + 1,
        title: this.newTodo,
        completed: false,
      });
      this.newTodo = "";
    },
    toggleCompleted: function (item) {
      item.completed = !item.completed;
    },
    removeItem: function (item) {
      this.todos = this.todos.filter((newItem) => newItem.id !== item.id);
    },
  },
......

This is a simple TODO app using vue2.
Please check out GitHub for the full codebase. https://github.com/shabeeb/vue2-todo

Demo: https://vue2-todo.pages.dev/
Thank you for reading.
please comment

 1,337 total views,  4 views today