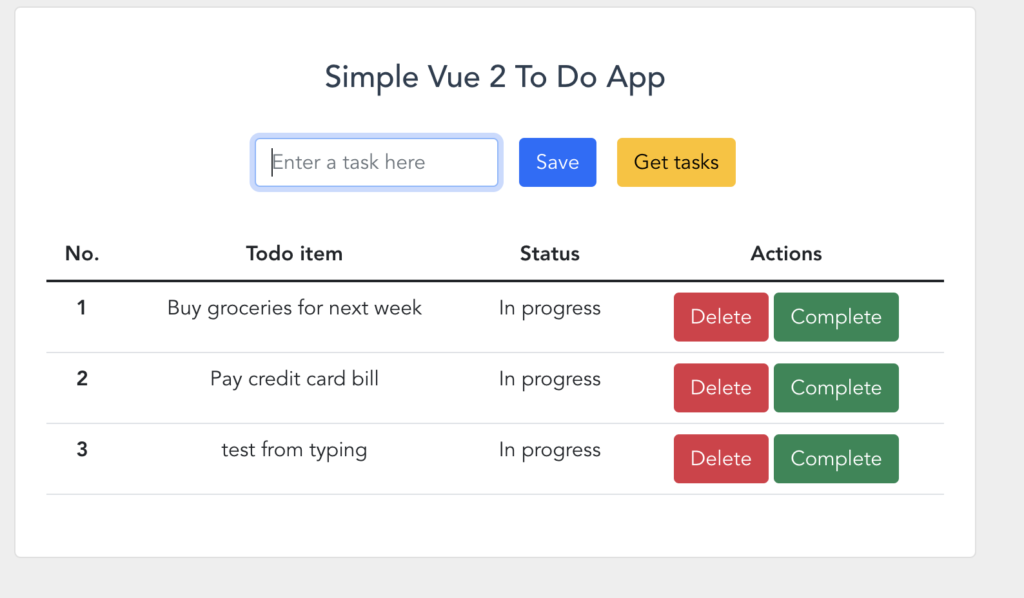
Let’s make a simple vue project example with a TODO list
Setup and Installation
There are two ways to set up Vue: through a VueCLI, or by including a script inside of your HTML file. Let’s do with VueCLI, We can install vue vueCLI globally
npm install -g @vue/cli or yarn global add @vue/cliOnce install complete, let’s create a project by using the below comment
vue create vue-simple-todo

Lets select Vue 2 for this example and click enter

Then it will ask for package manager ( Here i am going with npm in this case)

Here is my final screenshot after completing project stup
Now as mentioned there we can cd into folder and start server
npm run serve
Now server will run on http://localhost:8080/. We can open a browser and see basic vue template in browser

Now let’s take a look on codebase (I am using VS Code for editing files)
We can see App.vue and components folder below

Let’s start our coding 🙂
Let’s start with some cleanup, remove HelloWorld.vue from components, and create a new file TodoList.vue
Then we can import TodoList.vue inside App.vue
<template>
  <div id="app">
    <TodoList />
  </div>
</template>

<script>
import TodoList from "./components/TodoList.vue";

export default {
  name: "App",
  components: {
    TodoList,
  },
};
</script>
In TodoList.vue, We can start with the todo Skelton template, a very basic HTML todo Layout, and a simple vue class.
<template>
  <div class="hello">
    <section class="vh-100" style="background-color: #eee">
      <div class="container py-5 h-100">
        <div class="row d-flex justify-content-center align-items-center h-100">
          <div class="col col-lg-9 col-xl-7">
            <div class="card rounded-3">
              <div class="card-body p-4">
                <h4 class="text-center my-3 pb-3">Simple Vue To Do App</h4>

                <form
                  class="row row-cols-lg-auto g-3 justify-content-center align-items-center mb-4 pb-2"
                >
                  <div class="col-12">
                    <div class="form-outline">
                      <input type="text" id="form1" class="form-control"
placeholder="Enter a task here" />

                    </div>
                  </div>

                  <div class="col-12">
                    <button type="submit" class="btn btn-primary">Save</button>
                  </div>

                  <div class="col-12">
                    <button type="submit" class="btn btn-warning">
                      Get tasks
                    </button>
                  </div>
                </form>

                <table class="table mb-4">
                  <thead>
                    <tr>
                      <th scope="col">No.</th>
                      <th scope="col">Todo item</th>
                      <th scope="col">Status</th>
                      <th scope="col">Actions</th>
                    </tr>
                  </thead>
                  <tbody>
                    <tr>
                      <th scope="row">1</th>
                      <td>Buy groceries for next week</td>
                      <td>In progress</td>
                      <td>
                        <button type="submit" class="btn btn-danger">
                          Delete
                        </button>
                        <button type="submit" class="btn btn-success ms-1">
                          Finished
                        </button>
                      </td>
                    </tr>
                    <tr>
                      <th scope="row">2</th>
                      <td>Renew car insurance</td>
                      <td>In progress</td>
                      <td>
                        <button type="submit" class="btn btn-danger">
                          Delete
                        </button>
                        <button type="submit" class="btn btn-success ms-1">
                          Complete
                        </button>
                      </td>
                    </tr>
                  </tbody>
                </table>
              </div>
            </div>
          </div>
        </div>
      </div>
    </section>
  </div>
</template>

<script>
export default {
  name: "TodoList",
};
</script>

<!-- Add "scoped" attribute to limit CSS to this component only -->
<style scoped>
h3 {
  margin: 40px 0 0;
}
ul {
  list-style-type: none;
  padding: 0;
}
li {
  display: inline-block;
  margin: 0 10px;
}
a {
  color: #37dd92;
}
.stricked {
  text-decoration: line-through;
}
</style>
To get bootstrap let’s add bootstrap CDN to index.html (Or we install and add in App.vue also)
<link
      href="https://cdn.jsdelivr.net/npm/bootstrap@5.1.3/dist/css/bootstrap.min.css"
      rel="stylesheet"
      integrity="sha384-1BmE4kWBq78iYhFldvKuhfTAU6auU8tT94WrHftjDbrCEXSU1oBoqyl2QvZ6jIW3"
      crossorigin="anonymous"
    />
Now We can define data inside vue class, and move HTML labels from template to todos variable inside data. Here we define our todo list variable and assign some values.
data() {
    return {
      todos: [
        {
          id: 1,
          title: "Buy groceries for next week",
          completed: false,
        },
        {
          id: 2,
          title: "Renew car insurance",
          completed: false,
        },
      ],
    };
  },
Let’s add some logic to template also,
Since we moved todos from HTML table to vue, we can use v-for to show data in HTML as shown below.
<table class="table mb-4">
                  <thead>
                    ......
                  </thead>
                  <tbody>
                    <tr v-for="(todo, idx) in todos" :key="todo.id">
                      <th scope="row">{{ idx + 1 }}</th>
                      <td>{{ todo.title }}</td>
                      <td>
                        {{ todo.completed ? "Completed" : "In progress" }}
                      </td>
                      <td>
                        <button type="submit" class="btn btn-danger">
                          Delete
                        </button>
                        <button type="submit" class="btn btn-success ms-1">
                          Complete
                        </button>
                      </td>
                    </tr>
                  </tbody>
                </table>
Now the out will show as below

Now let us add some logic to save functionality
Add v-modal for input button and define v-modal inside data()
<input
                        type="text"
                        id="form1"
                        v-model="newTodo"
                        class="form-control"
                        placeholder="Enter a task here"
                      />

......
data() {
    return {
      newTodo: "",
      todos: [
        {
          id: 1,
          title: "Buy groceries for next week",
          completed: false,
        },
        {
          id: 2,
          title: "Pay credit card bill ",
          completed: false,
        },
      ],
    };
  },
Let’s add the click functionality for the save button, We can add methods below data() add functionality as below.
Finally, we will clear newTodo once we added to the current list. On the template, we call this method on the save button as below
<template>
....
<button
                      type="button"
                      class="btn btn-primary"
                      @click="addToDo"
                    >
                      Save
                    </button>
</tempate>
<script>
data() {
.....
},
methods: {
    addToDo(e) {
      e.preventDefault();
      this.todos.push({
        id: this.todos.length + 1,
        title: this.newTodo,
        completed: false,
      });
      this.newTodo = "";
    },

  },
.....
Now run server and see in action, we can type todo and on click, it will come on below list.

let’s add remove functionality and toggle functionality. To add both
<template>
.....
<tbody>
                    <tr
                      v-for="(todo, idx) in todos"
                      :key="todo.id"
                      :class="todo.completed && 'stricked'"
                    >
                      <th scope="row">{{ idx + 1 }}</th>
                      <td>{{ todo.title }}</td>
                      <td>
                        {{ todo.completed ? "Completed" : "In progress" }}
                      </td>
                      <td>
                        <button
                          type="submit"
                          class="btn btn-danger"
                          @click="removeItem(todo)"
                        >
                          Delete
                        </button>
                        <button
                          type="submit"
                          class="btn btn-success ms-1"
                          @click="toggleCompleted(todo)"
                        >
                          {{ todo.completed ? "Re-open" : "Complete" }}
                        </button>
                      </td>
                    </tr>
                  </tbody>
.....
</template>
<script>
......

 methods: {
    addToDo(e) {
      e.preventDefault();
      this.todos.push({
        id: this.todos.length + 1,
        title: this.newTodo,
        completed: false,
      });
      this.newTodo = "";
    },
    toggleCompleted: function (item) {
      item.completed = !item.completed;
    },
    removeItem: function (item) {
      this.todos = this.todos.filter((newItem) => newItem.id !== item.id);
    },
  },
......
This is a simple TODO app using vue2.
Please check out GitHub for the full codebase. https://github.com/shabeeb/vue2-todo
Demo: https://vue2-todo.pages.dev/
Thank you for reading.
please comment
1,532 total views, 2 views today

Leave a Reply